Assembling WAC Images
Contents
Assembling WAC Images

Description
The step-by-step instructions below will show you how to download uncalibrated Wide Angle Camera (WAC) images from LRO, and correct them using simple-to-use software created by Jim Mosher. All WAC images are freely available on the LROC Image Search website, and the whole procedure should take you less than 10 minutes to complete.- JohnMoore2
Starting off with a sample
Let's assume that you want a get a real good close-up view of a lunar feature, say, the crater Thebit, whose latitude and longitude coordinates you know are Lat 22.00°S and Long 5.00°W respectively.
Step 1
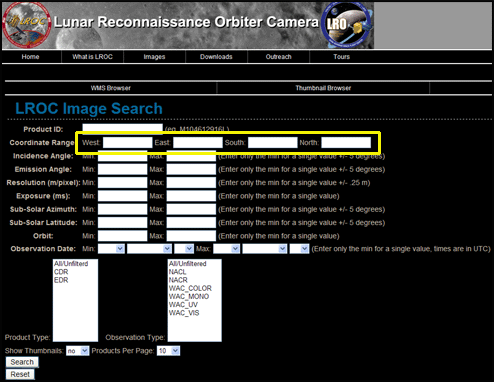
- The first thing you need to do is go to the LROC Image Search website where you will be presented with an image like Figure 1 below. Here you will see a lot of boxes that look like they all need to be filled in, however, all you need complete is the four ‘Coordinate Range’ boxes (highlighted in yellow).
Figure 1 The main LROC Image Search window.
Step 2
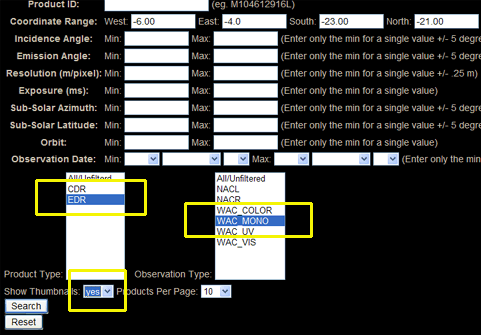
- The ‘West’ and ‘East’ range boxes are for longitude coordinates, while the ‘North’ and ‘South’ ones are for the latitude. Now, as Thebit has longitude and latitude coordinates of 5.00°W and 22.00°S respectively, type in numbers on either side of these into their relevant boxes for best returns on WACs available. In Figure 2 below, for example, -6.00 was typed into the ‘West’ box to represent 6.00°W (that is, it is ‘west’ of 5.00°W), and -4.0 was put into the ‘East’ box to represent 4.00°W (because it is ‘east’ of 5.00°W). The same for Thebit’s southern latitude, that is, -23.00 into the ‘South’ box (that is, it is ’south’ of 22.00°S), while the ‘North’ box has -21.00 to represent 21.00°S (because it is ’north’ of 22.00°S). You can choose any numbers you want, but the closer you are to the original coordinates on either side, the more honed in will be the returned WAC images. Note also, coordinates with a western longitude designation and a southern latitude designation must always have a negative sign before them.
Figure 2 Close-up of the ‘Coordinate Range’ boxes.
Step 3
- Next, click the yellow highlighted regions (‘EDR’ and ‘WAC MONO’ on the same page) as shown in Figure 3 below; being sure to change the ‘Show Thumbnails’ option to “yes”.
Figure 3 Three parameters that need to be checked upon.
Step 4
- Now all you have to do is click the ‘Search’ button (again on the same page at bottom left), and you should have a view as in Figure 4 below. The images listed on the right (highlighted in yellow) are all the WACs associated with the crater Thebit in it, so click on the one that you feel is the best.
Figure 4 A preview of the WAC images available.
Step 5
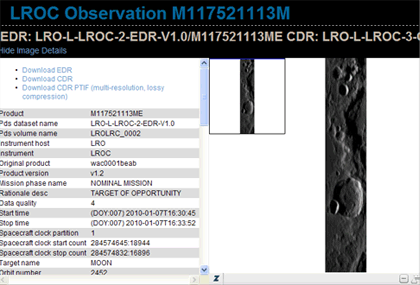
- WAC No.117521113ME was chosen from the list as it looked quite good in lighting details, so after clicking on it, a view as shown in Figure 5 below was presented.
Figure 5 View of the WAC image chosen.
Step 6
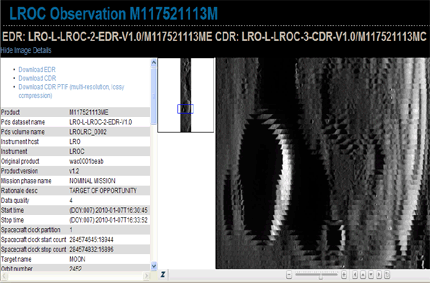
- Clicking on the main image in Figure 5 above allows you to zoom in (the cursor changes to a hand) on the feature of interest. In Figure 6 below, a zoomed-in look at Thebit crater is shown – note how regions around the crater have a ‘venetian blind’ effect to them. That effect is there because the image is still in its uncalibrated form. The LROC team of scientists haven't yet got round to correcting it, so this image may, in fact, be one that has never been viewed by human eye before. So, potential for discoveries by you alone are there for any feature you may be interested in.
Figure 6 A zoomed-in version of the WAC image chosen.
Step 7
- Save the image now by first right-clicking on ‘Download EDR’ at the top left of your screen, and from there in the following window, click ‘Save Target As’ to a folder of your choice on your own computer (note, the WAC file you will save will have a ".IMG" ending).
Step 8
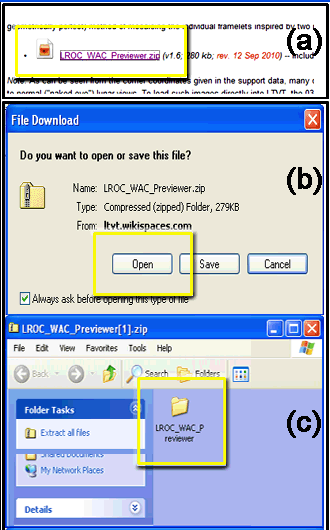
- Almost there! All you need do now is use a free software created by Jim Mosher that will correct the uncalibrated image for you (it will take you less than 30 seconds to correct). To do so, go here to Jim's webpage, and click on the ‘LROC_WAC_Previewer.zip’ file as shown in Figure 7(a) below. You now have Two Options on which way you want to use the software.
- The First Option is to click on the 'Open' button as shown in Figure 7(b) where you will see a window like that in Figure 7(c) below. Copy or drag the folder called LROC_WAC_Previewer to a convenient location on your hard drive, and start the program file itself by double-clicking on the LROC_WAC_Previewer_v1_6.exe (or similar) icon in that folder. Alternatively, you can double-click directly on the "folder" shown in the Figure 7(c) display and run the program from within it, but you won't have a copy on your hard drive after you exit the web browser.
- The Second Option is to click on the 'Save' button in Step 8b, in which case you will need to right-click or double-click on the downloaded file to unzip it (identical to the operations described above). However it is obtained, the unzipped folder includes detailed notes and instructions related to the operation of the latest version of the WAC Previewer, as well as the program's "source code" (from which it is compiled) and an editable "WAC_Previewer.ini" text file containing the parameters used for the distortion correction. Altering the values in the ".ini" file allows you to experiment with greater or lesser amounts of correction.
Figure 7 Procedures in the copying or saving of the LROC_WAC_Previewer file.
Step 9
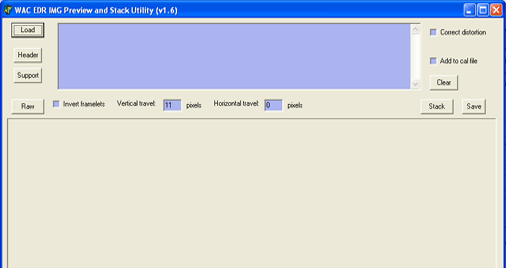
- Upon launching (double-clicking) the LROC_WAC_Previewer_v1_6.exe file, you should now see a view like that in Figure 8 below. Note, this shows the Version 1.6 interface, however, as Jim may update versions in the future the view below may not always look the same.
Figure 8 The WAC Previewer window.
Step 10
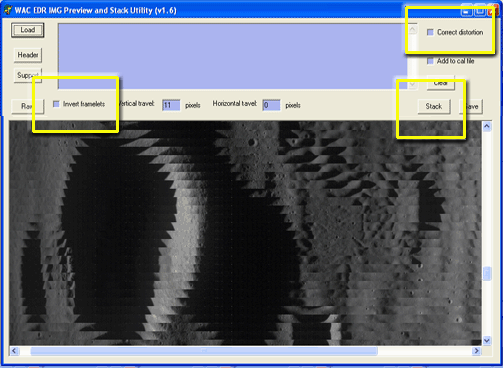
- Click now on the ‘Load’ button (top left) in the WAC Previewer window and choose the WAC image file that you saved (that is, the .IMG file). Confirm the image by clicking on the ‘Open’ button that appears in the following window, and you should now have a preview of the uncalibrated image like in Figure 9 below.
Figure 9 View of the uncalibrated WAC image with parameters that need checking.
Step 11
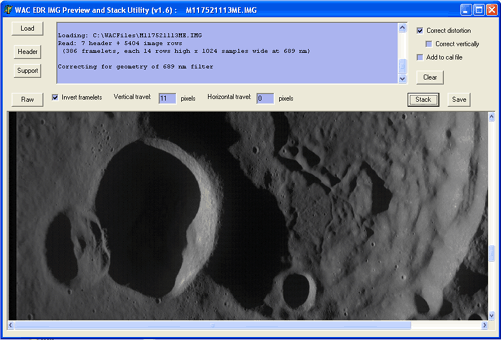
- All you have to do now is click the ‘Invert Framelets’ button, the ’Correct Distortion’ button, and finally the ’Stack’ button (all highlighted in yellow in Figure 9 above), which will then automatically calibrate (correct) the image for you – as shown in Figure 10 below. If the image looks initially to be slightly ‘jittery’ in the alignment of pixels in parts, play around with the ‘vertical travel’ option by increasing and decreasing them by, say, 1 or 2 pixels up or down (and possibly the ‘horizontal travel’ option by a much smaller amount). Hit the ’Stack’ button each time you change these values, and the final image should look excellent. Now all you have to do is click the ‘Save’ button which will be saved in the same folder you started off with. From there, you’re done...you have successfully corrected a WAC image.
Figure 10 View of the calibrated (corrected) WAC image.
NOTE 1 Because the LRO in its orbit may be taking some images while travelling from North to South, or South to North, rotating and/or mirror-reversing the final image may need to be done to suit the normal view of the image you calibrated. This is a simple procedure that can be done with software’s like ‘Photoshop’ or Windows ‘Paint’.
NOTE 2 All uncalibrated images above are credit of NASA/GSFC/Arizona State University.
Additional Information
LPOD Articles
Bibliography
